How to set-up a Record Player? A Beginner’s Guide
Setting up a record player is more than just plugging and playing like other devices. Certain things need to be done before a record has been played for the first time on the turntable.
An incorrectly configured system may result in distorted sound quality and record wear. It is a fun activity so don’t get intimidated and you get to know a lot about how warm music from a vinyl record is produced.

Note: In this article, the terms record player and turntable are used interchangeably.
Follow the steps below for an optimal record player setup.
Step 1. Placing on a flat surface
While setting up your record player, it is necessary to place it on a stable flat platform.
- Start by ensuring it sits on a flat surface.
- Use a bubble-level tool, place it on the sides of the record player, and check if the bubble is centered. If it’s not, adjust the record player legs.
- In cases where the legs aren’t adjustable, modify the platform using shims or cardboard pieces until it’s level.
- Also, level the platter from all sides so that the stylus evenly tracks on both sides of the grooves
Step 2. Connecting the Belt and Platter
There are two types of record players, belt-drive and direct-drive turntable. The process of connecting the belt and platter in the belt drive turntables is as follows:
- Lift the platter from the spindle.
- Place it inverted and loop the belt around the drive rim on its underside
- Bring the platter back to the spindle.
- Rotate the platter so the square opening on the platter is over the pulley.
- Pull the belt through the square opening in the platter, hooking it over the pulley using the attached ribbon.
- Remove the ribbon from the Belt.
- Place the rubber mat and the dust cover on the turntable.

Step 3. Balancing the tonearm
The stylus could not properly track the grooves of the record if the tonearm is not balanced.
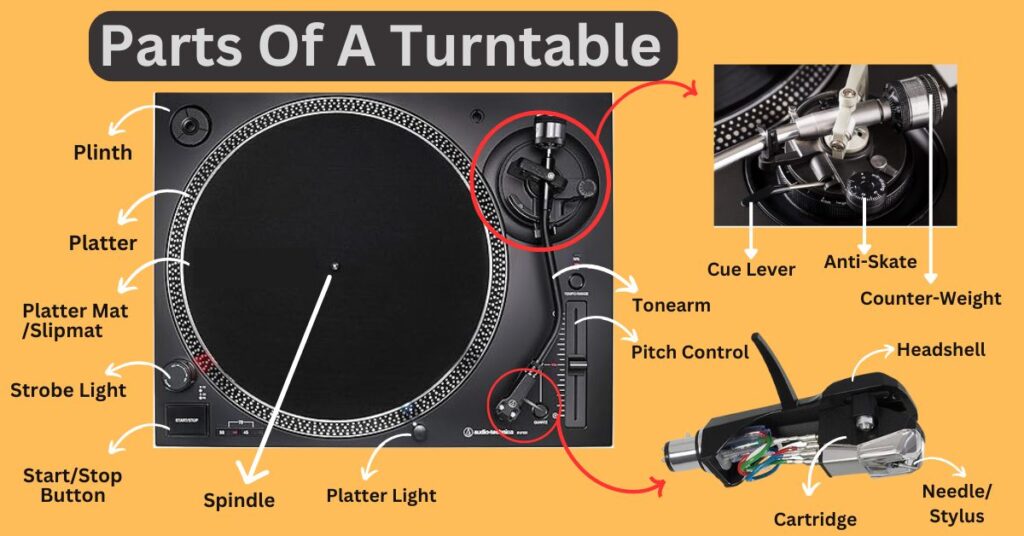
- Add the counterweight at the end of the tonearm.
- Rotating it counterclockwise adds weight to the tonearm and vice-versa.
- Now vertically balance the tonearm to the level parallel to the platter by adjusting the counterweight.
- Lock the tonearm in that position.
Step 4. Setting the Vertical Tracking Force (VTF)
The vertical tracking force is the correct amount of weight at which the stylus tracks the grooves of the record. Excess of weight can cause record wear while too little force may result in the needle jumping off the record. The cartridge manufacturer specifies this force.
The steps involved in correctly setting the tracking force are:
- Check the manual to find the recommended tracking force of the cartridge.
- To calibrate the tracking force, first turn the black dial to zero located at the front of the counterweight. Do not rotate the whole counterweight.
- If the cartridge maker has recommended the tracking force of 2 grams then rotate the whole counterweight from behind to the reading of two.
- Since measurements may not always be precise, use a stylus weighing gauge to check the tracking force and make adjustments accordingly.
Step 5. Setting the Anti-Skate
As the record moves and stylus tracks grooves, there is a natural tendency of the tonearm to move or ‘skate’ across the record towards the center due to inward pull. The anti-skate is the small outward force applied to the tonearm to counter this tendency.
The steps involved in setting the anki-skate are as follows.
- Locate the anti-skating control at the side of the tonearm controls.
- Adjust the anti-skate dial to match the tracking force setting i.e. if tracking force is set at 2 grams then rotate the anti-skate dial to 2.
- No measurement is accurate so it requires a little bit of experiment.
- Play an LP record and check for sibilance and distortion by placing the stylus at different points. Adjust the anti-skating accordingly for optimal sound quality.
Step 6. Aligning the Stylus
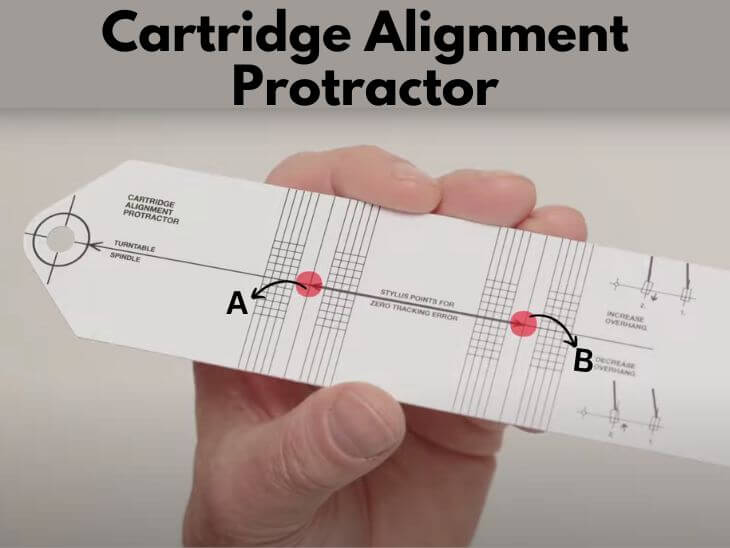
To align the stylus, a tool known as a protractor is needed it is a sheet of paper with some alignment drawings. You can take a printout of protractors from here.

- Lightly lose the headshell screws.
- Attach the protractor to the spindle.
- Bring the tonearm on the protractor so that the stylus touches point B.
- Align the front edge of the cartridge so that it is parallel to the horizontal grid line on point B
- Bring the tonearm to point and repeat the same step with point A and adjust the cartridge accordingly.
- Now kindly tighten the screws without using force.
It is a one-time process and you will need to align the cartridge again only when it is required to replace it.
Step 7: Connecting the Speakers
After setting up the record player, the next crucial step is connecting it to your speakers. The specific setup can vary based on your hi-fi system, involving a combination of preamps, amplifiers, receivers, and speakers.
If your record player has the built-in phono preamp, then follow the steps to connect it:
- Connect the record player with the speaker using an RCA cable.
- Select the line mode.
- Switch on the power supply of the record player and speaker and check the audio quality.
Some record players don’t have a built-in preamp, so you have to connect a separate preamp to the turntable before linking it to the speakers using RCA cables.
In summary, setting up a record player can be a bit challenging, but with practice, you’ll achieve better results. If your first attempt doesn’t yield the best outcome, don’t be discouraged. Follow the steps carefully, and you’ll be able to set up your hi-fi vinyl stereo system correctly at the end.