
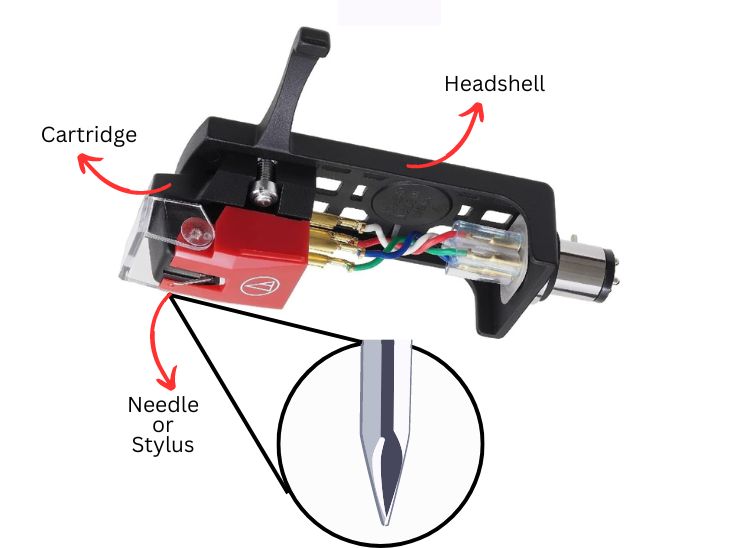
The needle or stylus is the most critical part of the record player. It establishes the connection of the vinyl record with all the other components of the record player.
The first time, I learned the importance of a stylus when the audio from my turntable starts producing hiss and pop sounds. I had done everything from cleaning a record to checking the connections but the problem persisted. Then, I read somewhere that, needle is the busiest part of the turntable and requires replacement after some time.
In this article, we’ll explore what factors contributes the damage of needle, when it is required to replace and a detailed guide on how to effectively replace a needle.
Note: The terms Record Player and turntable are used interchangeably for each other in the article.

Why replace a needle?
The needle plays a crucial of tracking the grooves of the vinyl records. In the process, a needle is positioned on the spinning record so that it can trace the vibrations of the record. After some usage the needle tends to wear down due to the following reasons:
- As you play your record, the dust, lint, and greasy residues settle down within the grooves over time. When these dust particles come into contact with the needle during playback, the needle can experience wear and tear.
- If the anti-skate is not set properly, the stylus will favor one side of the groove and that side of the stylus will wear down faster than the other.
- Record wear and tear also depends on the spinning speed, if you are listening 45s more than 33 ⅓, then the stylus is more used as the record moves faster and makes more contact with the record.

Even the needle, which is made up of the hardest material on the earth (i.e. diamond) wears down after some time.
When a needle becomes excessively worn or damaged, you’ll begin to notice distortions in the sound output. Furthermore, continued use of a damaged needle poses a risk of wearing your vinyl records.
When to replace a needle?
The ideal time to replace a stylus can vary between manufacturers and usage patterns. Some may claim a lifespan of 1000 hours, while others may only last for 100 hours.
For instance, if a manufacturer recommends a maximum of 400 hours of playback time and you typically play for 2 hours a week, you should consider changing the stylus every 3.5 years.
While it can be challenging to precisely track the number of hours your stylus has been in use, you can also look for some key indicators:
1. No Previous Replacement: If you’ve owned your record player for an extended period and have never changed the stylus, it’s a clear sign that it’s time for a replacement.
2. Unusual Sound Output: When your favorite records suddenly start sounding strange, with distortion or sibilance, this is a strong signal that it’s time to replace the stylus.
3. Used Record Player: If you’ve purchased a second-hand vintage record player from a sale or shop, it’s advisable to replace the needle. An old stylus can potentially harm your valuable records.
4. Record Wear: After playing your records, if you observe signs of wear on them, it’s essential to replace the stylus. A damaged needle can contribute to additional wear and tear on your records.
Things to remember before replacing a needle
There are certain points you need to look after before replacing a needle.
1. Type of cartridge: There are two types of cartridges moving magnet (MM) and moving coil (MC). In MM cartridges, the stylus is replaceable, while in MC cartridges, you’ll need to replace the entire cartridge.
2. Good quality stylus: Always use good quality needles as suggested in the manual. Low-quality needles degrade faster and deliver subpar sound quality.
Replacing a Needle in a Turntable: Step by Step Guide
To replace a needle you need only two things, a new needle and steady hands. The process of changing the needle is not difficult, you can change it at home without the need of going to the repair shops. The following steps are involved in replacing a needle or stylus in a turntable:
Step 1: Identify the needle type
First, you have to do some research about the needle your turntable is having. It can be identified with the cartridge serial number or you can check the manual. If you do not have a manual then check online or consult an expert. Choosing the right type of needle is necessary. For more details about the needle types, their working and cleaning, you check our detailed article about record player needles.
Step 2: Disconnect the headshell from the tonearm
If you have the right needle, then the next step is to unplug the record player from any power source and unscrew the headshell from the tonearm gently without applying much force.
In some models, the cartridge is directly attached to the tonearm with screws in that case you have to unscrew the cartridge with the help of a flathead screwdriver.
Step 3: Unlock the cartridge
Remove the cartridge from the headshell. Carefully disconnect the four wires from the back of the cartridge, using pliers. Taking a picture of the wire connections before removing them can help ensure correct reconnection to the cartridge later.
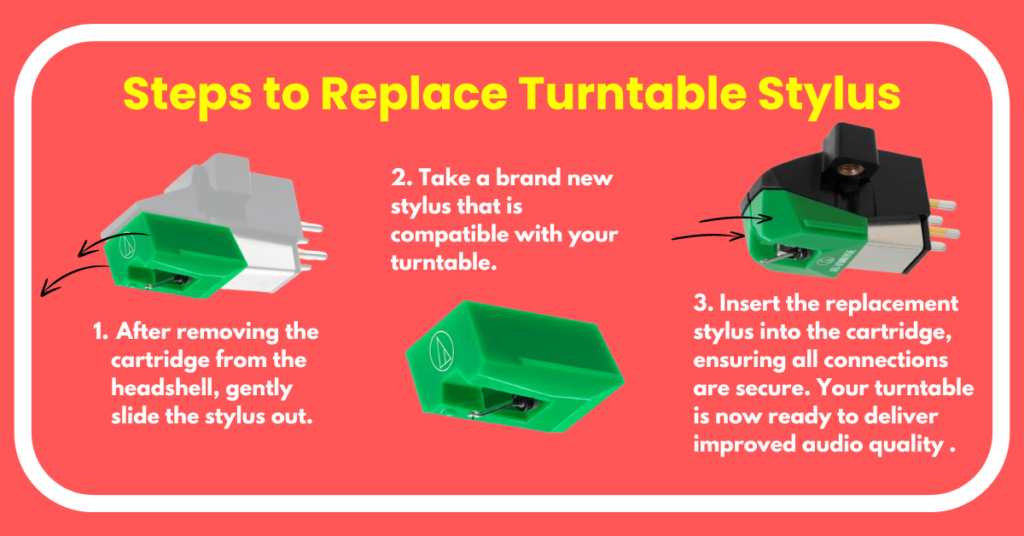
Step 4: Change the needle
Remove the old needle by sliding it out from the cartridge. Now wear anti-static gloves or wash your hands to keep oil or dirt away. Then, mount a new needle by sliding it in, and make sure that the needle is pointed downwards.
Step 5: Remount the cartridge
The next step is to remount the cartridge to the headshell or tonearm by making sure that all the wires are joined to the cartridge terminal correctly.
Make all the adjustments regarding tracking force and anti-skate properly and you are ready to enjoy the music of the record.
Step 6: Check the Sound Quality
To ensure everything is in working order, listen to the audio output. If the sound doesn’t meet your expectations, don’t worry. Revisit the above steps to verify that all connections are secure and accurate.
How to take care of needles of the record player?
- Always clean the needle with a stylus brush before playing any record.
- Do not touch the stylus with your fingers as the oil and dirt can accumulate on the stylus which potentially distort the quality of the music.
- Always clean the record before playing, Clean records reduce the risk of dust and dirt buildup on the needle, extending its lifespan.
- Most cartridges come with a stylus cap, make sure to use it after each play.
- Set proper tracking force and anti-skate to prevent needle as well as record wear.
In conclusion, replacing your stylus at the right time ensures both the longevity of your records and the quality of your listening experience.
By diligently following this comprehensive guide, you will get all the answers regarding the replacement of the stylus.